# Backend
The backend consists of a simple Node + Express application with additional plugins like Nodemon (facilitates the development process while the app is running in background) and Multer, the most used middleware for adding file management features as it is not necessary to use the File System, maintaining the software separated from the hardware, and allowing different configurations (single/multiple file upload, filters, error handling, etc). The backend is deployed and has a index.html file with a form to test the functionality directly from the server side.

Backend running on
http://localhost:3000| Image selection
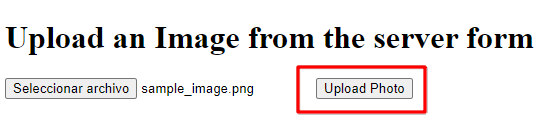
Image preview and upload
Images are stored in the ./public/img folder and the application is ready for adding a database like MongoDB, MongoDB Cloud or Firebase and store base64 encoded images on it.
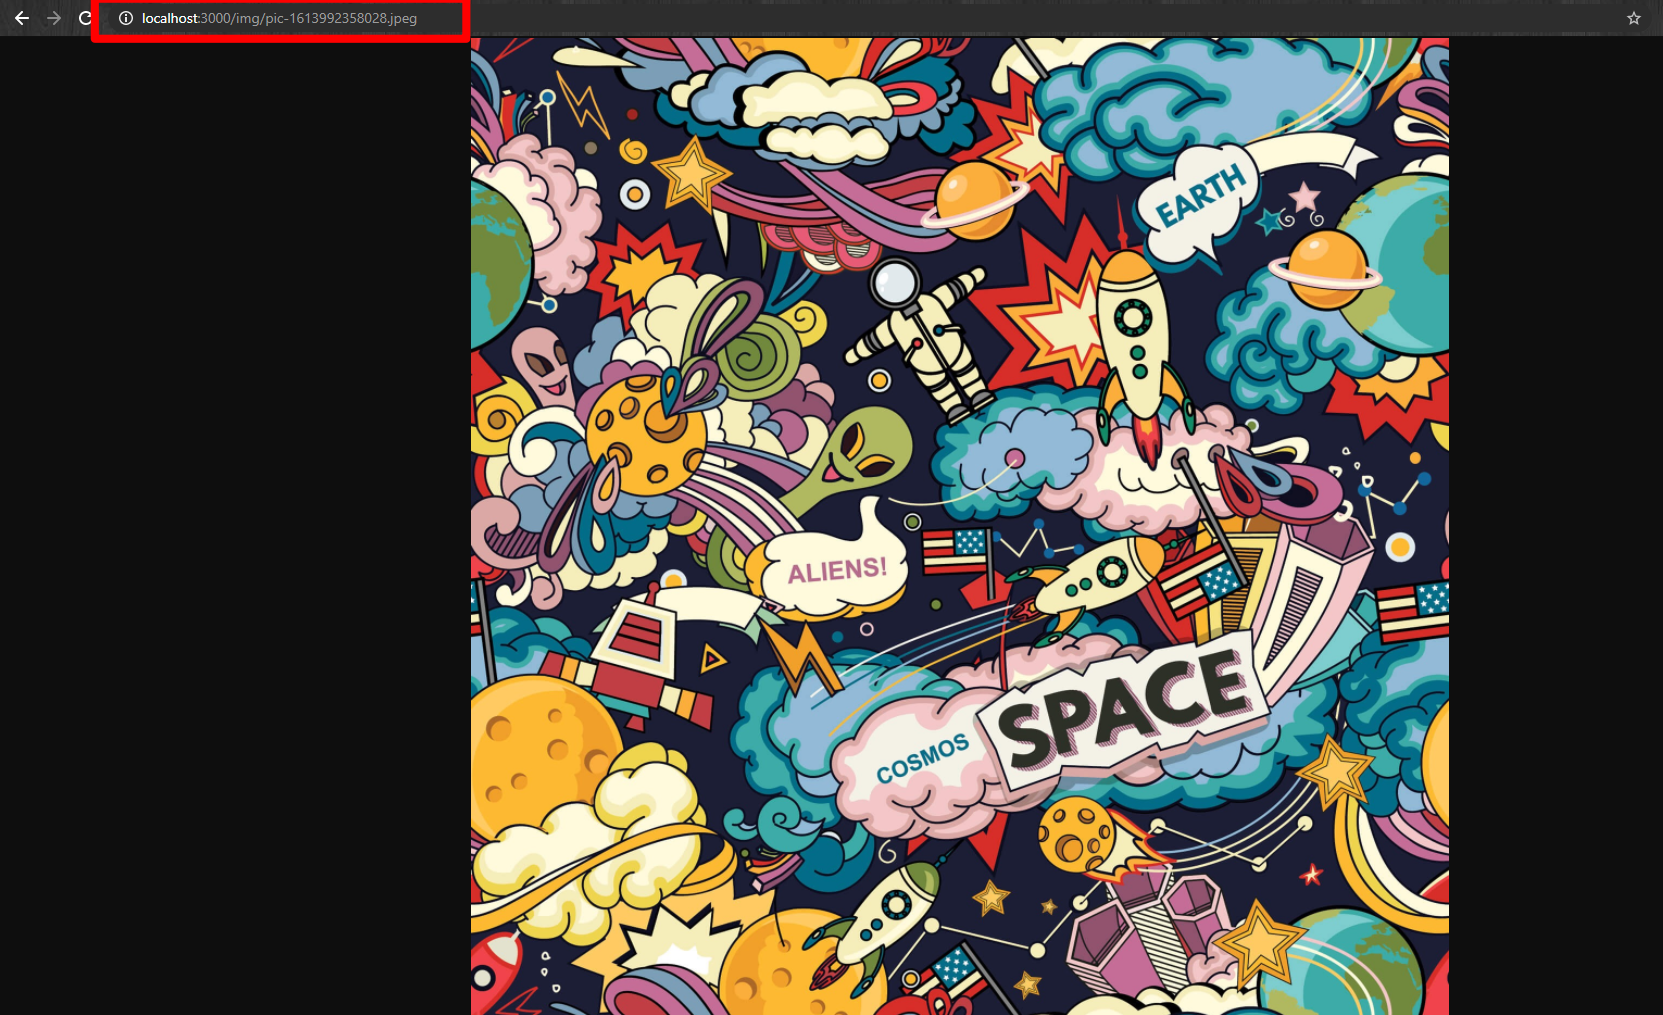
Backend image serving
# Middlewares and Frameworks
# Express
Express is a web application framework for NodeJS. It is used for designing and building web applications quickly and easily.
Installation
npm i express
Usage
const express = require('express');
const app = express();
2
The express.static() function allows to serve files from the ./public folder without installing any other plugin
app.use(express.static('public'));
# Cors
Facilitates working locally with Google Chrome browser allowing access to restricted resources from all domains.
Installation
npm i cors
Usage
const cors = require('cors');
Allow all origins on HTTP request headers
app.use(cors({ origin: '*' }));
# Multer
As said before, Multer middleware allows users to upload and manage single/multiple files and includes different features for error handling and filtering.
Installation
npm i multer
Usage
const multer = require('multer');
Set destination folder for uploaded files and change file name by adding a timestamp to it in order to prevent collisions
const storage = multer.diskStorage({
    destination: (req, file, cb) => {
        cb(null, 'public/img');
    },
    filename: (req, file, cb) => {
        const ext = file.mimetype.split('/')[1];
        cb(null, `pic-${Date.now()}.${ext}`);
    }
});
2
3
4
5
6
7
8
9
Use multerFilter to check the mimetype of the uploaded files and allow only images (PNG/JPG/JPEG)
const multerFilter = (req, file, cb) => {
    if (file.mimetype == 'image/jpeg' || file.mimetype == 'image/jpeg' || file.mimetype == 'image/png') {
        cb(null, true);
    } else {
        const error = new Error('The file you are trying to upload is not an image. Only .png/.jpg/.jpeg extensions are allowed.', 400);
        error.code = 'ERROR_FILETYPE';
        return cb(error, false);
    }
};
2
3
4
5
6
7
8
9
Include the previous data in a variable to be processed in HTTP requests
const upload = multer({
    storage: storage,
    fileFilter: multerFilter,
    limits: {
        fileSize: 2097152 // Allow images up to 2MB size
    }
});
2
3
4
5
6
7
# Cookie Parser + CSURF
The use of Cookie Parser is recommended to add token-based request verification for each HTTP request.
Installation
npm i cookie-parser csurf
Usage
const csrf = require('csurf');
const cookieParser = require('cookie-parser');
2
Allow cookies for CSURF with the {cookie: true} option. The order of initialization is important
app.use(cookieParser());
var csrfProtection = csrf({ cookie: true });
2
# NodeJS vs NginX vs Others for upload static content
From what I have been able to verify, NginX is the best web server for static content.
# NodeJS
- Versatile web server
- Can be integrated with almost all environments and JavaScript frameworks without investing too much time
- Is more user friendly, and there are a lot of middlewares to solve any problems with the setup
- The memory usage of a basic NodeJS server is high, but it performs very well for scalable applications
# NginX
- Is one of the lightests web servers currently (if not the lightest)
- A basic static server can be deployed in few minutes (similar to NodeJS)
- Integrations with other coding environments like Python or PHP can be a bit tricky
- NginX is a C-based web server engine strong focused on using as less memory as possible, so it is perfect for serving static files
# Others
Other possible solutions are Apache (1.x/2.x), LiteSpeed or Lighttpd.
- Apache servers were the standard and the most extended servers for web pages few years ago, and the community has developed lots of plugins for different third-party integrations, but for static content it is not the best or even a good option over NodeJS or NginX. Years ago I used Apache 2.1 to deploy a server with a Raspberry Pi, and the initial setup was surprisingly easy, but it gave me a lot of trouble every time I changed a part of the code or wanted to add something that was not predefined
- Both LiteSpeed and Lighttpd are very good options, but after doing some research, I found out that it is better to use NginX than those ones, because despite of being similar in memory usage, NginX is more flexible as it has a very good community support and plugins to fit with different frontends
# Security
- Multer filter functionality has been used to prevent users to upload files that are not images from the server form
- Multer property to change the image name and add a timestamp to prevent uploading images with the same name
- No security method has been implemented to prevent the direct access to the API from the server itself because the idea is to have the client and the server working together but the assignment specifies that the server has to be capable of serving images by itself. In other case, the use of JWT/CSURF to authenticate requests also from the server should be the best option
# Frontend
Third assignment was started as soon as a first version of the backend was running. A Vue app was created including some plugins like Vuetify (styling) or Vuex (notification system) to it. The frontend application consists of one component for the notifications and two components for the image upload system. The first of those is a Home screen with a Upload an image button that deploys the second floating component called Upload.
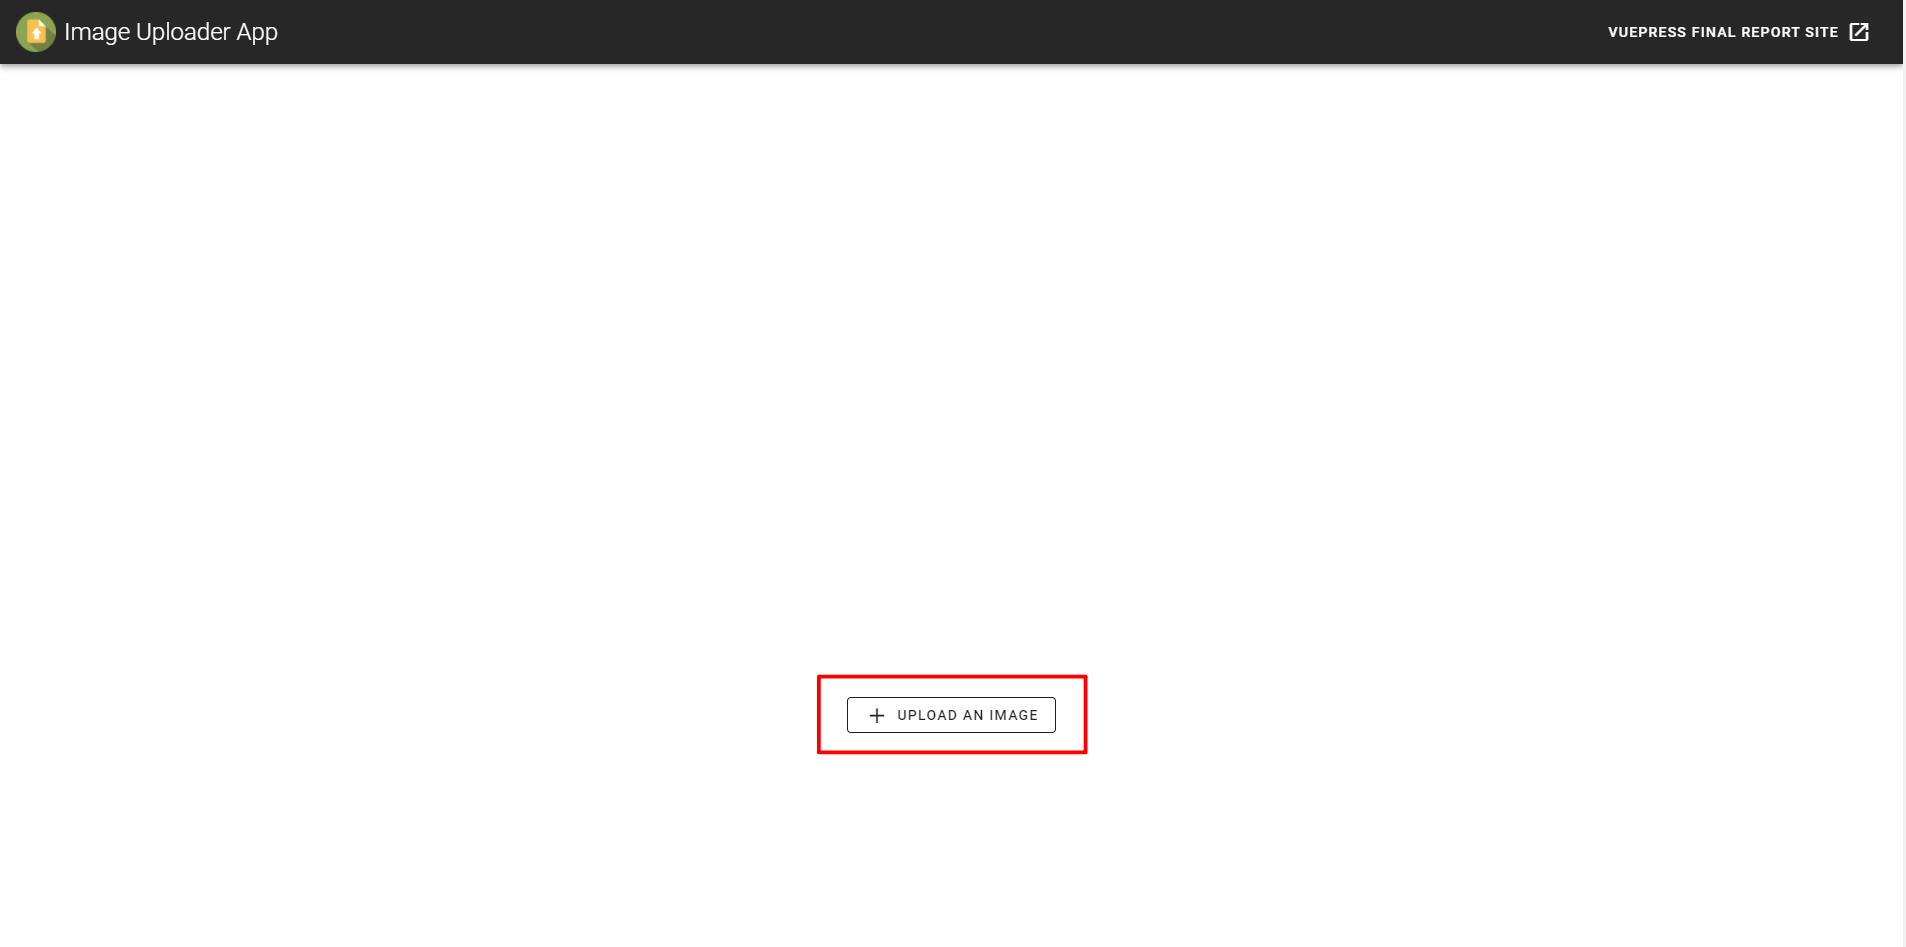
Frontend (Home)
The second component is a Dialog box created using the v-card component and adding the Drag&Drop functionality to it. When Drag&Drop was working, a button for uploading files manually was added to the Dialog box.
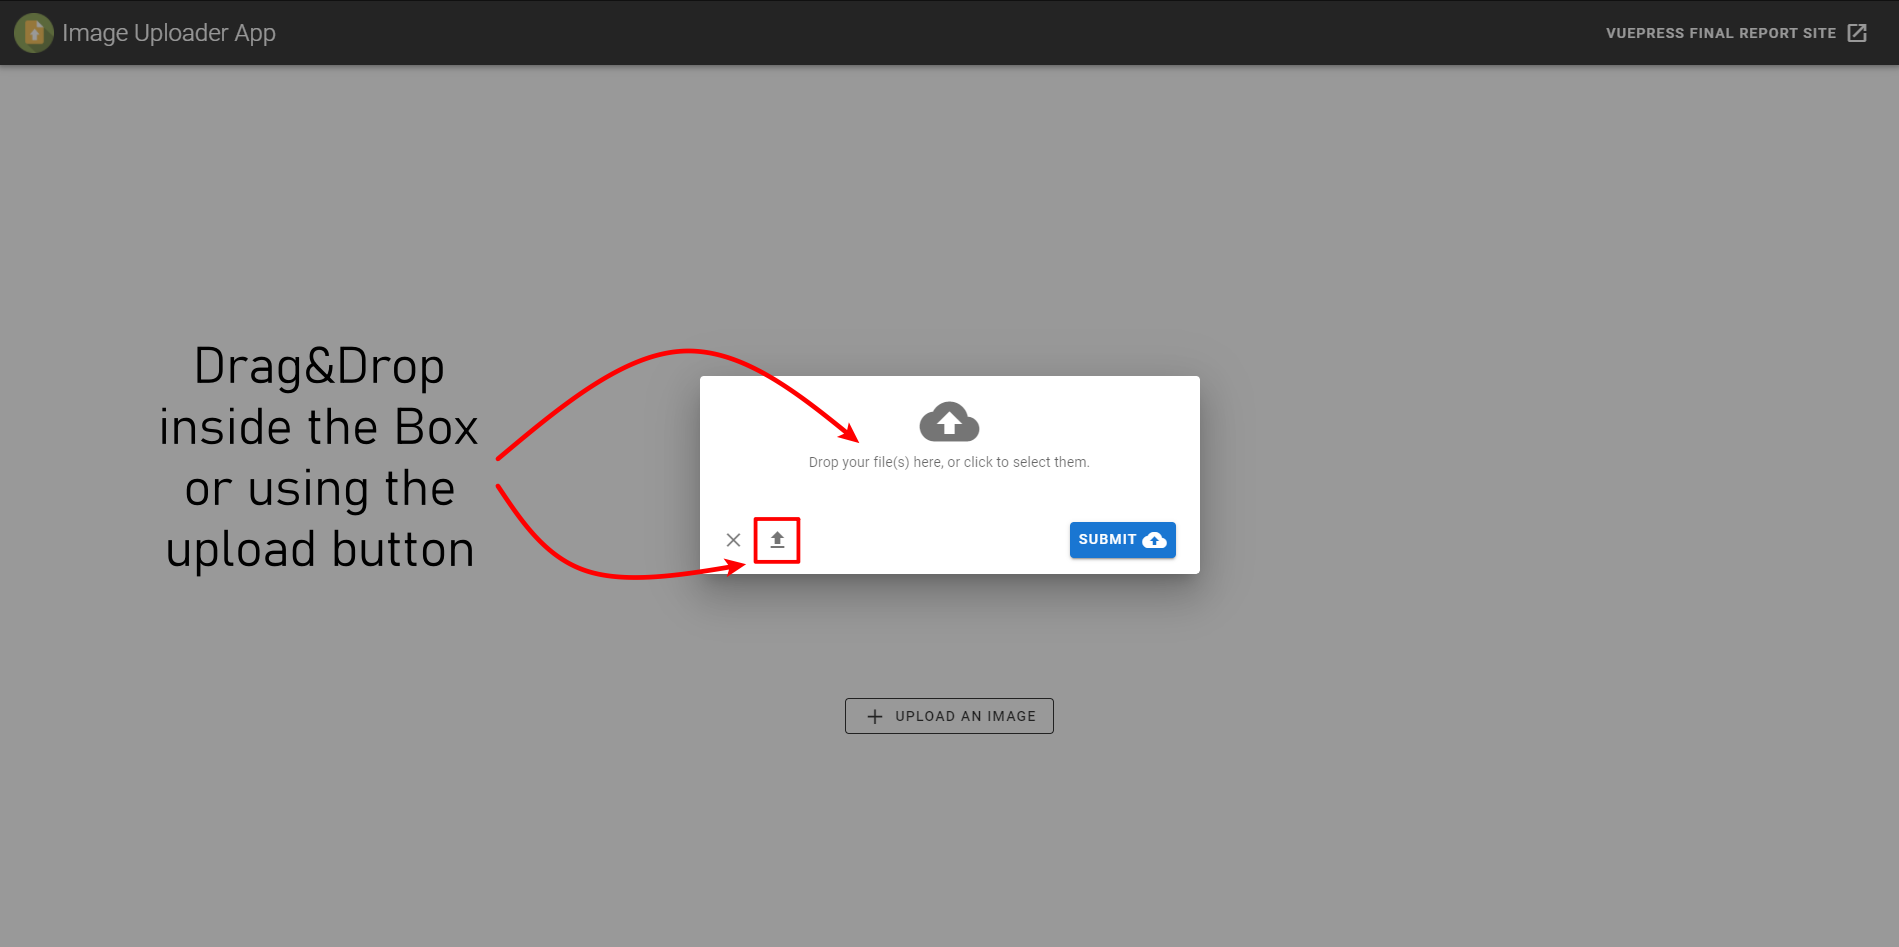
Floating Dialog box to upload images
Added security on the frontend to prevent users to upload files that are not images from the button (used the input accept property). The application supports uploading multiple files at the same time.
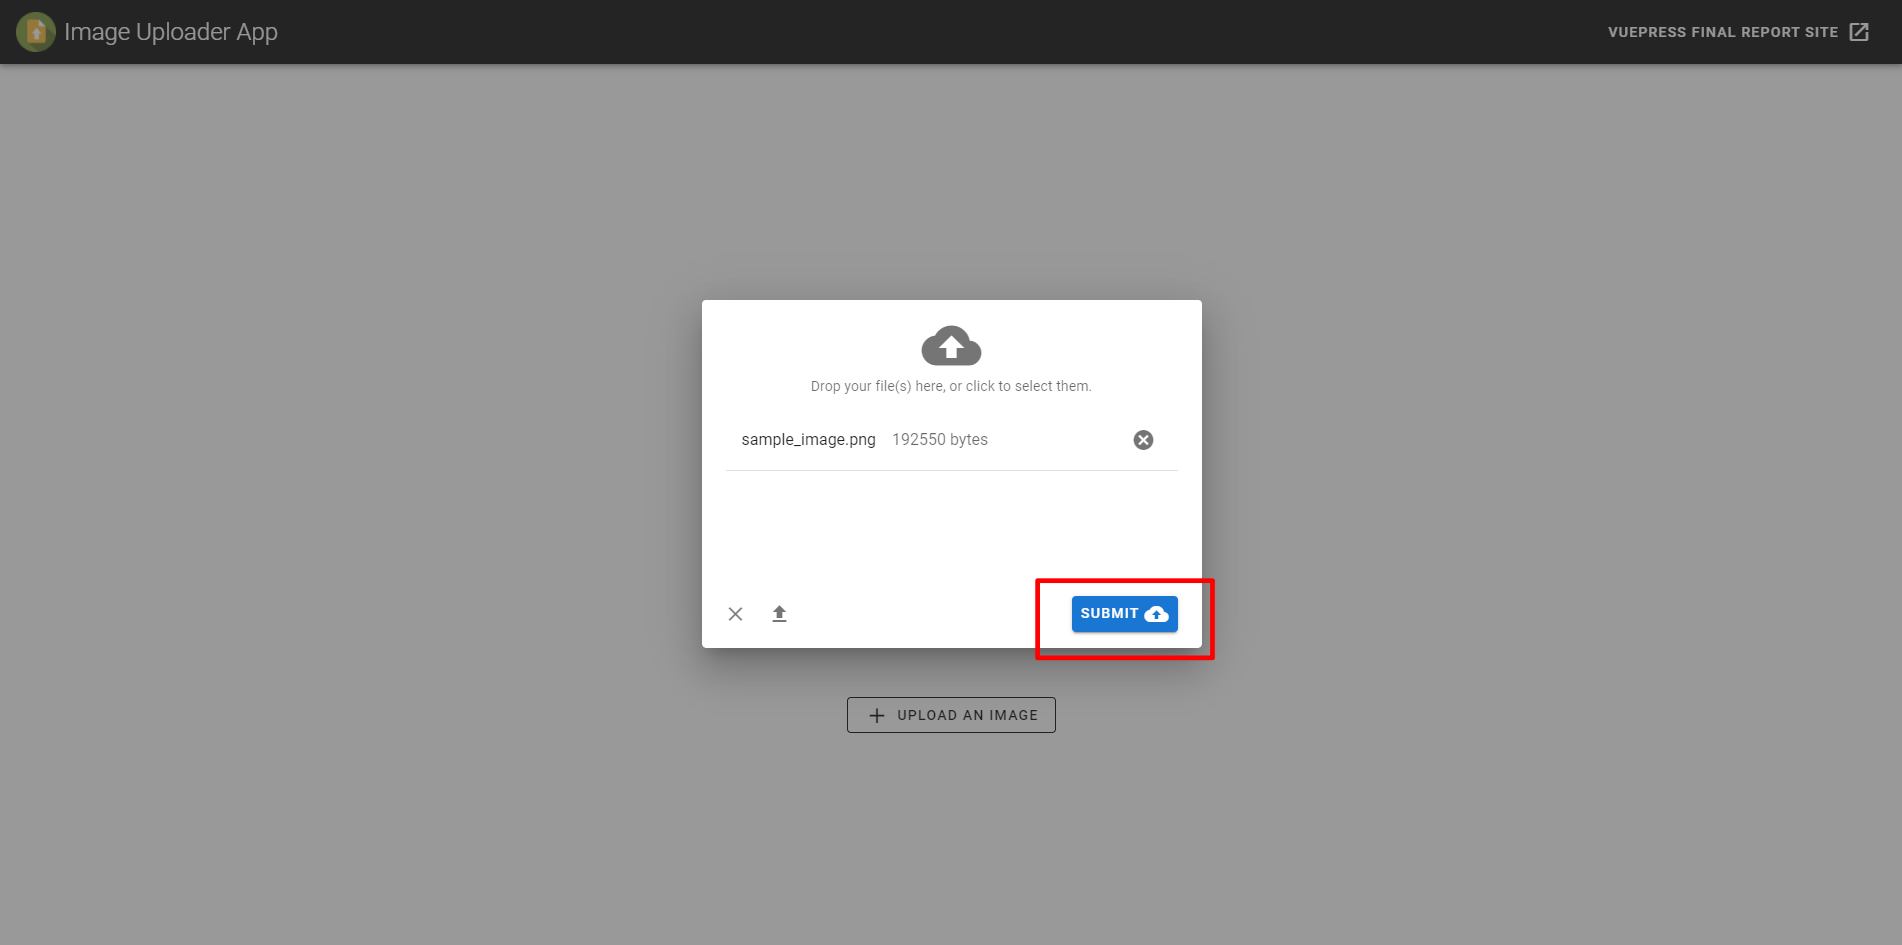
Image name and size preview
In order to display the image, all files are passed to the parent component using the emit function.
Also the application has a notification system that alerts the user of the different errors, warnings or when files have been uploaded successfully.
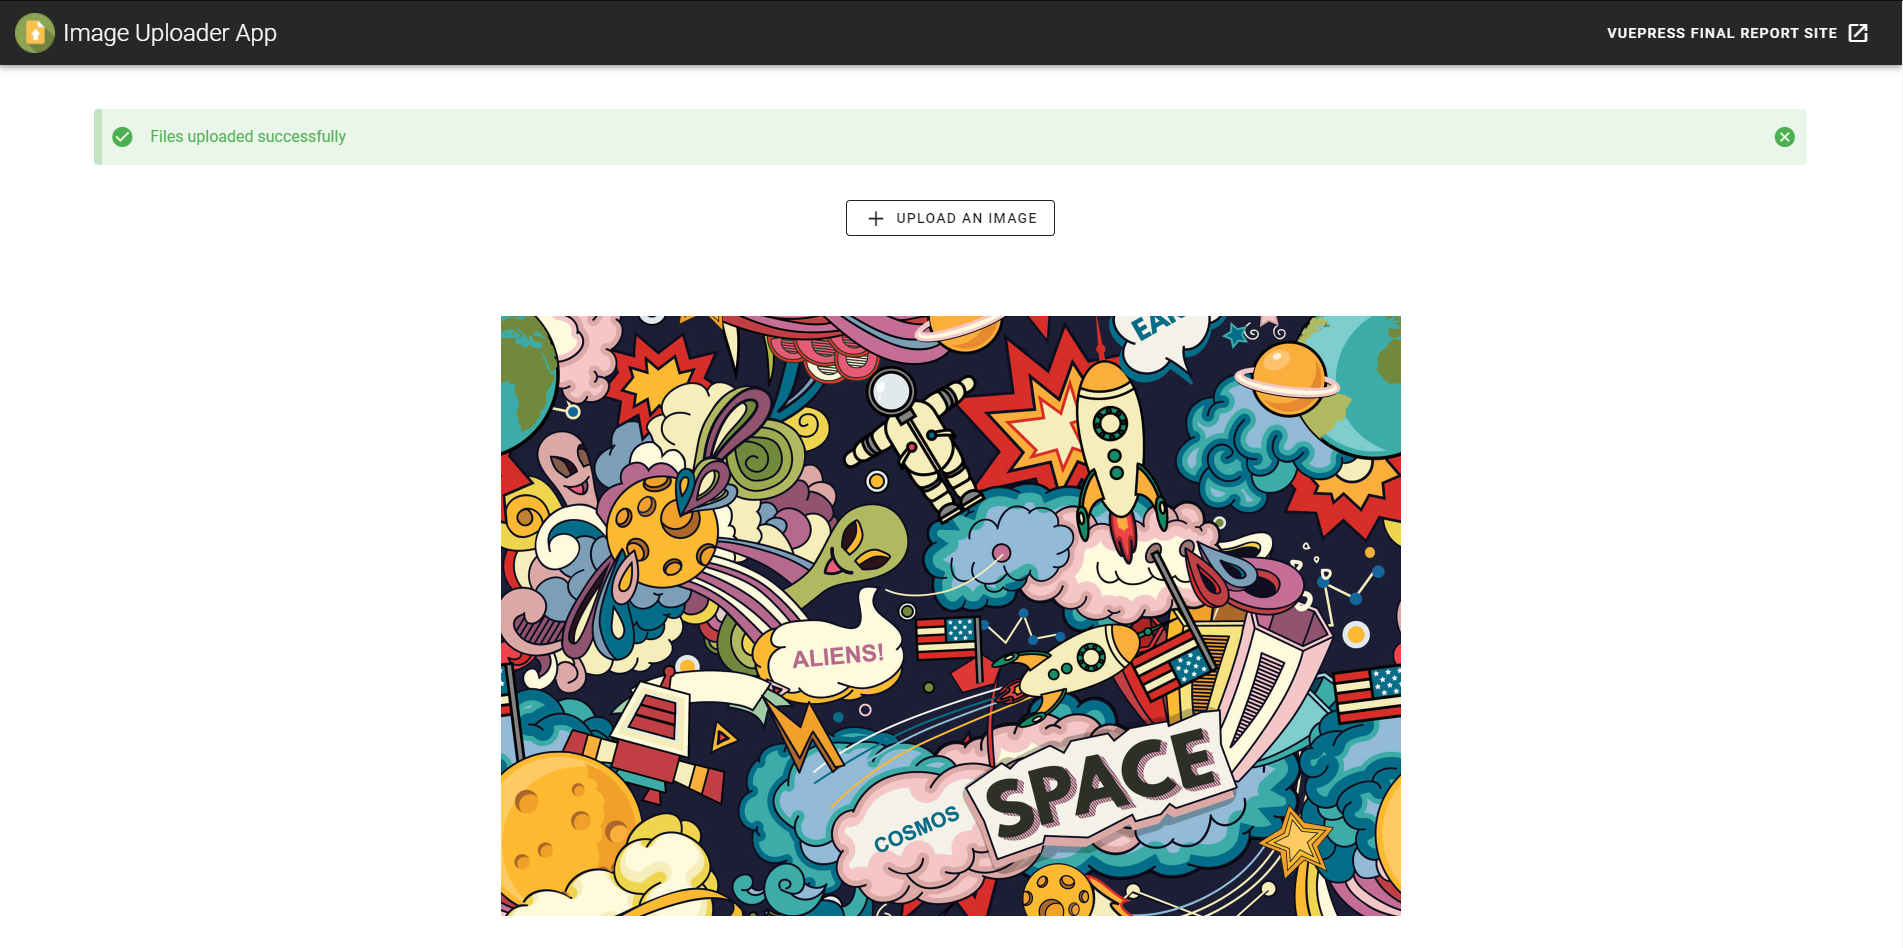
Image serving on Home component
# Connection and data validation
Axios and VueRouter have been used to connect the frontend with the server.
# Backend POST
app.post('/uploadmultiple', upload.array('picture'), (req, res, next) => {
    const imgArray = req.files;
    if (!imgArray) {
        const error = new Error('Invalid files.');
        error.httpStatusCode = 400;
        return next(error);
    }
    res.status(201).json({ files: imgArray });
});
2
3
4
5
6
7
8
9
# Frontend Routing
Installation
npm i axios vue-router
Axios Usage
const axios = require('axios');
axios.defaults.baseURL = 'http://localhost:3000/';
2
To use VueRouter, it is recommended to create a separated folder, in this case is ./src/router/index.js
import Vue from 'vue'
import VueRouter from 'vue-router'

Vue.use(VueRouter);

const routes = [{
    path: '/',
    name: 'Home',
    component: () =>
        import ('@/components/Home.vue')
}]

const router = new VueRouter({
    mode: 'history',
    base: process.env.BASE_URL,
    routes
});

export default router;
2
3
4
5
6
7
8
9
10
11
12
13
14
15
16
17
18
19
HTTP Requests with Axios example
axios.post("/uploadimagecli", formData)
    .then((res) => {
        this.sendFileToParent(res.data.file.filename);
        this.$store.dispatch("addNotification", {
            message: "Files uploaded successfully",
            color: "success",
        });
    }).catch((err) => {
        console.log("ERR: " + err.response.data.error);
        this.$store.dispatch("addNotification", {
            message: err.response.data.error,
            color: "error",
        });
});
2
3
4
5
6
7
8
9
10
11
12
13
14
# Flow Diagram
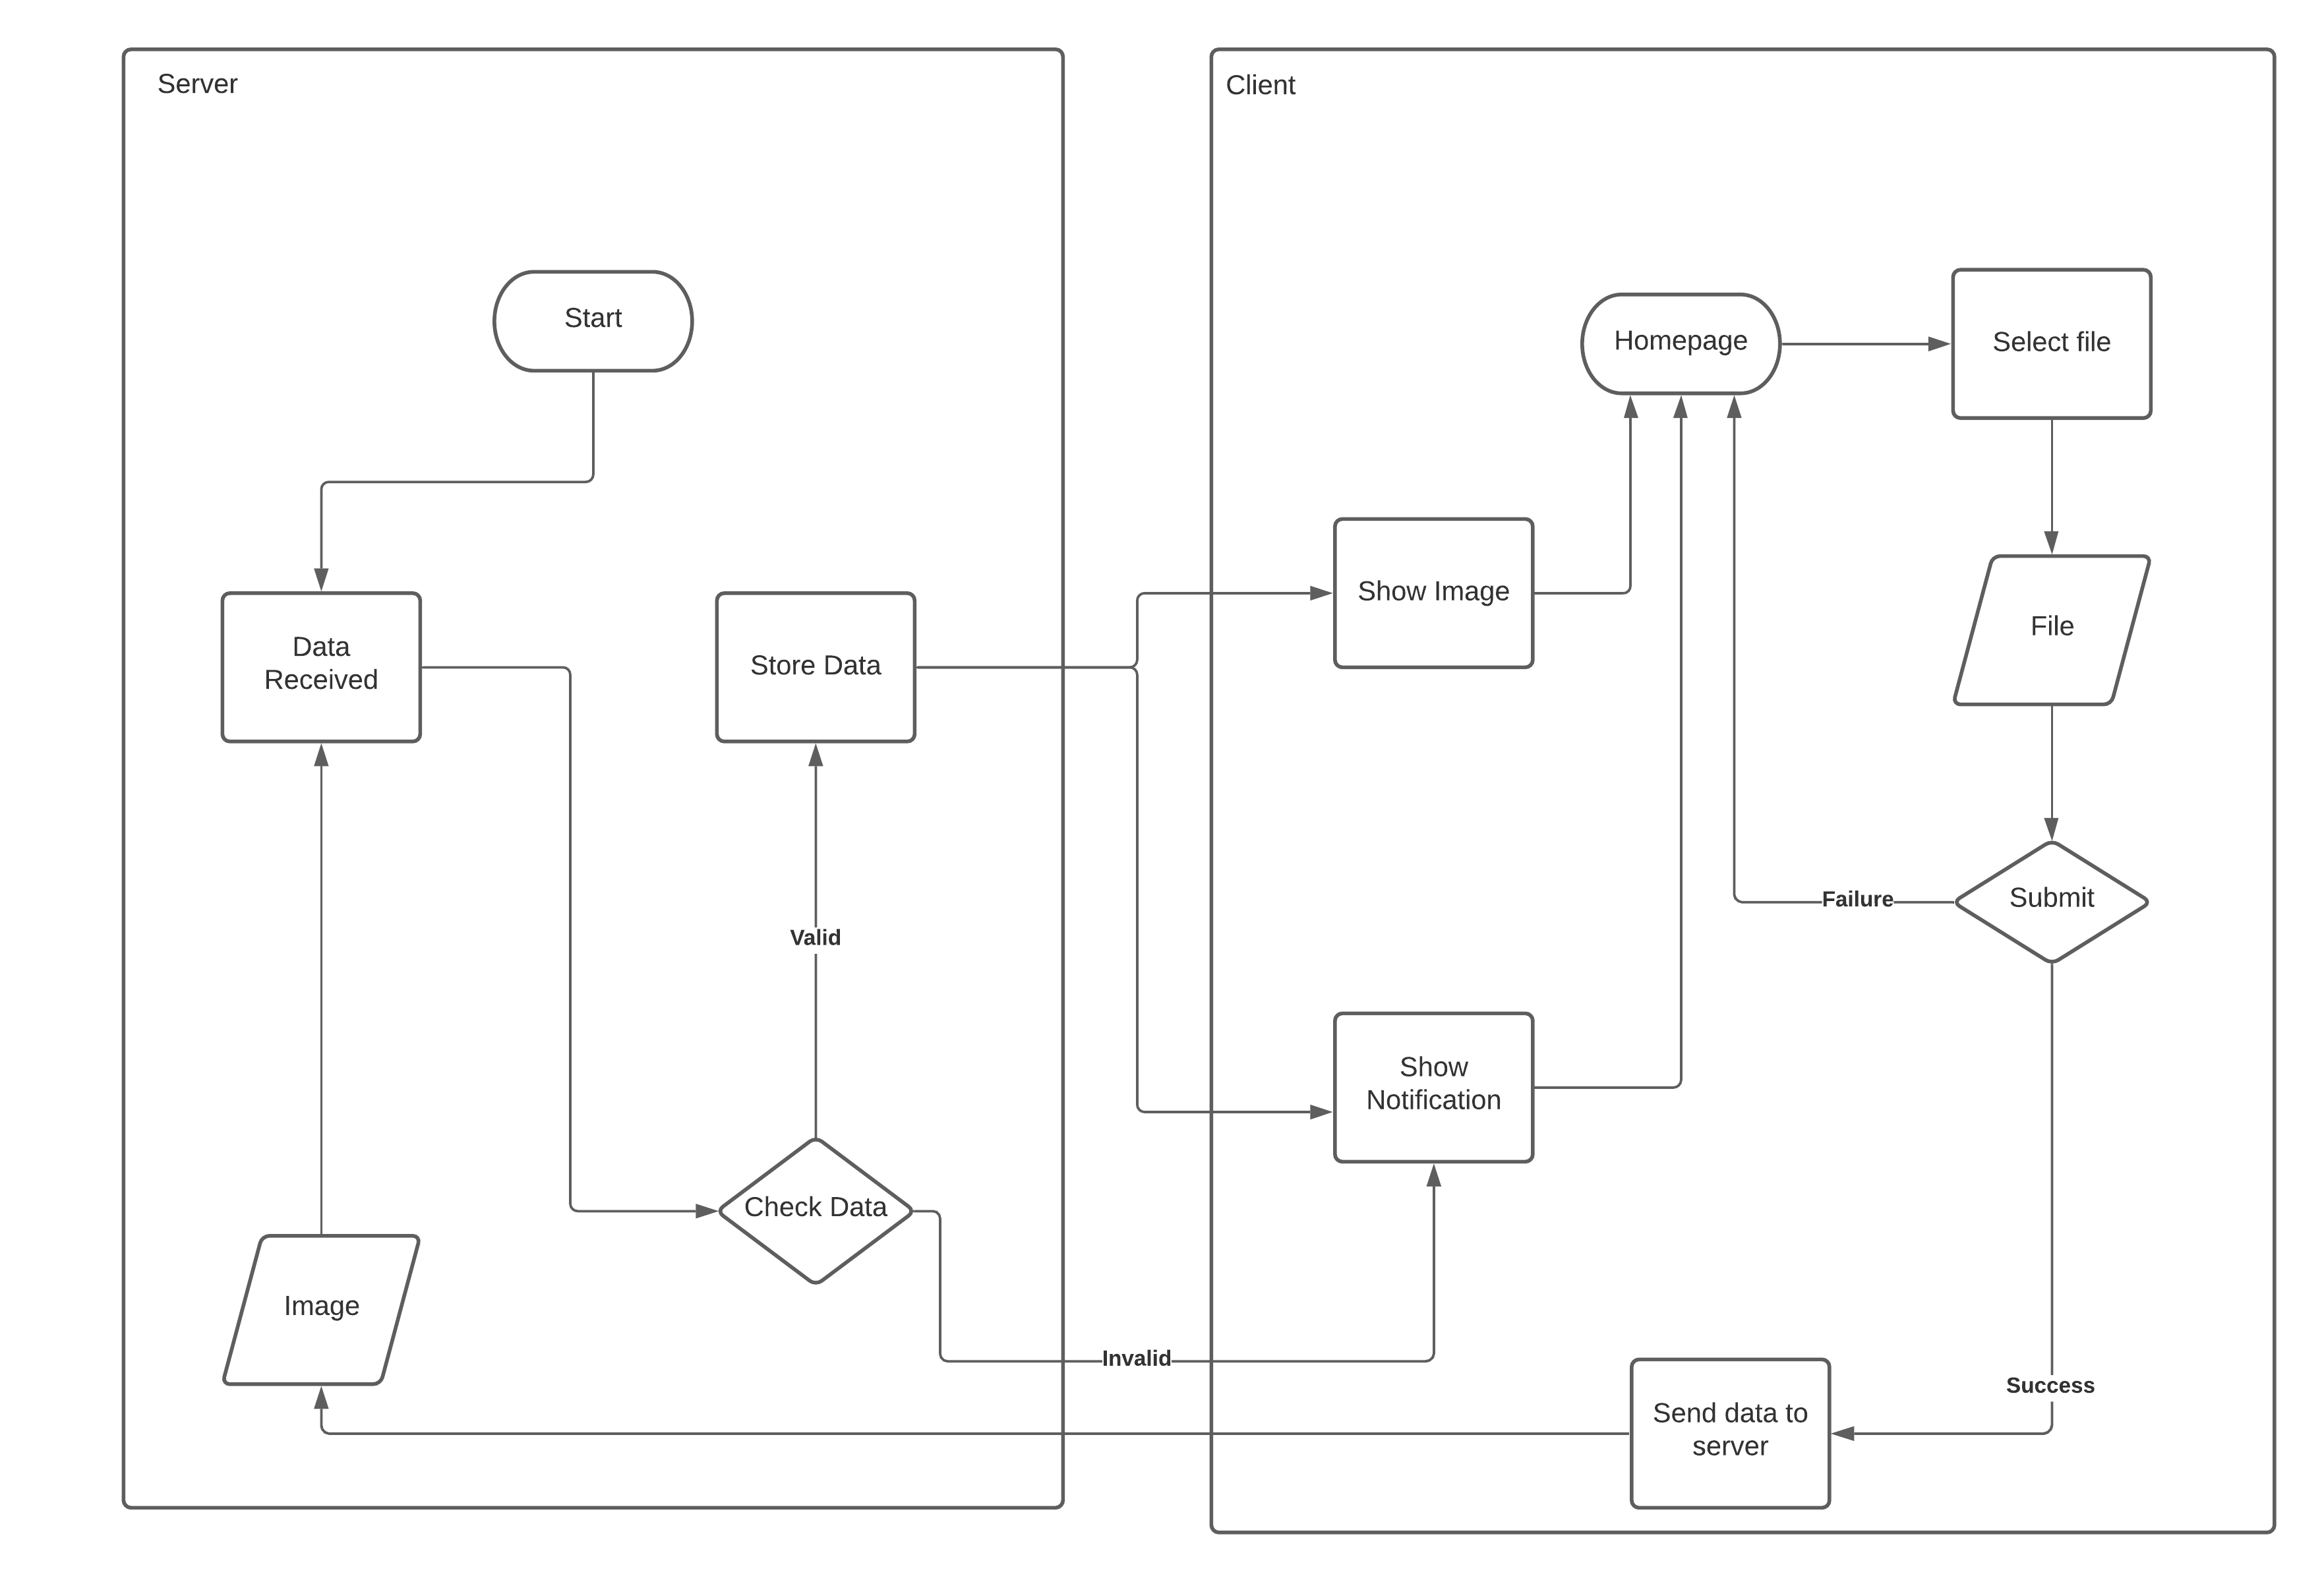
Flow diagram Backend & Frontend
# Image Resize
In order to resize the uploaded images, there are two ways:
# Image resizing on client side
Resizing images on client side is the common way to do it because this method does not affect the original image dimensions, but it can be difficult depending on the framework and elements containing the images.
If the images are shown within a Vue <v-img> or HTML <img> component, there is no problem fitting the image to the needed dimensions
<v-img src="src_url" max-height="max_height_in_px" max-width="max_width_in_px" contain></v-img>
The contain property prevents the component to crop the image if the dimensions are higher than the specified ones
Using elements like the Vuetify <v-carousel>, the images will not be completely responsive. If images of different dimensions are uploaded, the carousel will be as large as the larger of the uploaded images, if the max-width/max-height properties allow it.
# Image resizing on server side
Due to the problems with some client-side elements for showing images of different sizes in the proper way, there is a Node module that can work with Multer to store the images with custom dimensions.
The module is multer-sharp-resizer (opens new window)
# Image crop
There are different Vue plugins to modify the uploaded files before storing them in the server-side. This plugins allow to crop, rotate and resize the image while previewing it and have different properties to fix the maximum size or aspect ratio of an uploaded image.
# Image crop tools
# Using vue-advanced-cropper
Vue Advanced Cropper is the chosen tool to apply this functionality to the application.
New ImageCropper component has been created and the functionality to upload the images has been passed from the Upload component to this new component. The image is uploaded and sent to the parent component (Home) using a FileReader instead of using the FileSystem or a Vue Loader plugin in order to avoid adding too much charge to the application.
The cropper use is simple but has a lot of properties to set it up in the way that it is needed. Here is an example of the cropper required to accomplish the mentioned task
<cropper
    class="cropper-background"
    :src="img"
    ref="cropper"
    @change="change"
    :stencil-props="{
        handlers: {},
        movable: false,
        scalable: false,
    }"
    :stencil-size="{
        width: 600,
        height: 400,
    }"
    image-restriction="stencil"
/>
2
3
4
5
6
7
8
9
10
11
12
13
14
15
16
Vue Advanced Cropper has also another modules included like for example the preview component, that allows to preview the image before cropping it.
<preview
    style="margin-top: 10px"
    :width="150"
    :height="100"
    :image="result.image"
    :coordinates="result.coordinates"
/>
2
3
4
5
6
7
export default {
data() {
    return {
      result: {
        coordinates: null,
        image: null,
      },
      coordinates: {
        width: 0,
        height: 0,
        left: 0,
        top: 0,
      },
      // ...
    };
  },
  methods: {
    change({ coordinates, image }) {
      this.result = {
        coordinates,
        image,
      };
    },
    // ...
  }
}
2
3
4
5
6
7
8
9
10
11
12
13
14
15
16
17
18
19
20
21
22
23
24
25
26
The image received by the
ImageCropperisbase64encoded, so there is a difference when sending the image to the server-side, having to change theimgobject and convert it into ablobobject. Here is the submit function
const { canvas } = this.$refs.cropper.getResult(); // Get result from the cropper plugin

if (canvas) {
const form = new FormData();
// Create a new blob object
canvas.toBlob(
    (blob) => {
    console.log("blob: ", blob);
    form.append("picture", blob);
    axios
        .create({ withCredentials: true })
        .post("/uploadmultiple", form, {
        headers: { crossdomain: true, "Content-Type": "undefined" },
        })
        .then((res) => {
        this.sendFilesToParent(res.data.files);
        this.$store.dispatch("addNotification", {
            message: this.$t("alert.filesUploaded"),
            color: "success",
        });
        })
        .catch((err) => {
        console.log("ERR: " + err.response.data.error);
        this.$store.dispatch("addNotification", {
            message: err.response.data.error,
            color: "error",
        });
        });
    } /*Second parameter can be used here to specify file forma e.g. "image/jpeg". Default: png */
);
}
this.closeDialog();
2
3
4
5
6
7
8
9
10
11
12
13
14
15
16
17
18
19
20
21
22
23
24
25
26
27
28
29
30
31
32
The files are stored in the server-side once cropped and then passed to the client-side using the
$emitfunction.

When the image is uploaded, a cropper Dialog Box is displayed for the user to crop the image and then send it to the server
# Storing images with fixed dimensions
In order to store the images with a fixed dimensions, there are different ways to do it, but it generally depends on the requirements of the application. For this purpose, there are no file restriction when uploading, which means that users can upload images with smaller dimensions than the minimum allowed. In this case it is necessary to fill the area with blank space until the minimum height or/and width allowed.
<cropper
...
    :min-width="600"
    :min-height="400"
    :max-width="600"
    :max-height="400"
...
/>
2
3
4
5
6
7
8
The code above makes the stencil sized that the saved images will have dimensions of 600x400 pixels
This also add the need of moving the stencil around the blank space to center the image.
<cropper
...
    imageRestriction="none"
...
/>
2
3
4
5
This property add blank space around the image to fill the minimum dimensions set previously (600x400px)
# Advanced recipes
There are a lot of different options to customize the cropper and make it fit with all application requirements. It is recommended to visit the website and read the documentation, especially the Concepts section, which explains the core concepts of image cropping in a general way and the properties that this module offers to adjust or modify the default behavior.
# Future work
- The use of Vue Advanced Cropper makes the application perform slower when showing and modifying the preview and the cropper component
- Even with fixed size of images, the quality of the cropped images is very low. This could be fixed choosing a higher image dimensions, but this also could be a problem for smaller images. The image dimensions chosen have to be in balance so that bigger images do not lost much quality and smaller images do not seem to be very small inside the complete frame.